
Electric Moped and Motorbike Cleaning Kit: The Essential Guide for Electric Mopeds

Flex Electric
The UK's #1 Electric Moped and Electric Motorbike dealer.
Your electric moped is probably dirty in all the places that matter most. Road film around the swingarm, grit tucked behind the front mudguard, water marks near the charge port, and a layer of black paste where grime has mixed with old lubricant. Most riders look at that mess and think a bucket, a sponge, and whatever cleaner is in the garage will do.
That’s where expensive mistakes start.
A proper cycle cleaning kit can be useful for electric mopeds, scooters, and motorcycles, but only if you use the right products in the right places. Generic bicycle advice often ignores the parts that matter on a Vmoto, LiveWire, Segway, or kids electric MX bike. Displays, charging points, battery seals, motor casings, painted panels, belt drives, and exposed connectors all need a different level of care from a pedal bike drivetrain.
Clean it properly and you protect finish, moving parts, and electrical reliability. Clean it badly and you can create corrosion, push water where it shouldn’t go, strip protection from surfaces, or mark bodywork that was fine before you started.
Why Your Electric Moped Needs a Specialised Clean
A dirty electric moped isn’t just untidy. On UK roads, the grime is usually a mix of rainwater, traffic film, brake dust, winter salt, oily residue, and fine grit. That combination sticks to bodywork, settles around wiring runs, and sits in seams where moisture hangs around far longer than most riders realise.
That matters because electric mopeds and motorcycles aren’t just bicycles with bigger tyres. They have sealed electrical systems, charging hardware, sensitive switchgear, painted body panels, and in some cases belt drives that shouldn’t be treated like a chain-and-cassette setup. A harsh degreaser that might seem harmless on an old pedal bike can be the wrong product entirely for a scooter side panel, battery surround, or belt-driven commuter.
What generic bike advice gets wrong
A lot of mainstream cleaning advice is built around conventional bicycles. It assumes exposed chains, cassettes, derailleurs, and simple frame tubes. That’s not the case for many electric two-wheelers used on UK streets.
Cycle cleaning kit coverage in Cycling Weekly highlights an underserved angle here. Existing content largely focuses on traditional pedal bikes, while electric two-wheelers surged 29% to 118,000 units in 2024, with 40% used by delivery fleets, and forums show 65% of users query safe degreaser use around e-bike motors. Those numbers point to the same practical problem: more riders are buying electric machines, but the cleaning guidance hasn’t kept up.
If you ride daily for work, the risk is even more obvious. Delivery riders and commuters see the worst of British weather. Wet roads throw muck into battery surrounds and undertrays. City grit gets embedded around moving parts. If that stays there, it doesn’t just look bad. It accelerates wear and encourages corrosion.
Practical rule: If a cleaner doesn’t clearly look suitable for painted finishes, plastics, and areas near electrical components, don’t let it near your electric motorcycle.
The biggest mistakes I see
Most damage during cleaning comes from impatience, not neglect. Riders want the bike clean quickly, so they reach for the most aggressive method.
That usually means one of these:
- Pressure washing too closely. Water gets driven past seals, into switchgear, around bearings, and into places that should stay merely damp, not flooded.
- Using one product for everything. A strong degreaser has a place on chain grime or stubborn deposits, but not on every panel and trim piece.
- Scrubbing with the wrong brush. Dirty wheel brushes dragged across painted bodywork will leave marks.
- Ignoring drying. Water left in crevices around fasteners, brackets, and electrical housings can create problems long after the wash is done.
For off-road electric motorcycles and kids MX bikes, the same principle applies with more mud involved. Mud looks soft, but once it dries and gets rubbed around, it behaves like abrasive paste. The cleaning process has to remove contamination first, then contact the surface.
Deconstructing the Ideal Electric Motorcycle Cleaning Kit
A good cycle cleaning kit for an electric motorcycle isn’t one miracle bottle. It’s a set of separate tools, each doing one job safely. If a kit is missing key pieces, you’ll improvise. Improvisation is how riders end up using an old household brush on gloss paint or a solvent-heavy degreaser where it doesn’t belong.

The core products that actually matter
Start with a pH-neutral general cleaner. This is the product that should do most of the work on bodywork, plastics, mudguards, fork lowers, wheels, and painted panels. On an electric scooter or moped, this is your safest default because it cleans road film without behaving like a strip-down solvent.
Then add a targeted degreaser. This is only for the dirty mechanical areas that need it. If your bike has a chain, that usually means chain run, sprocket area, and built-up grime around the lower rear section. If your bike uses a belt drive, your approach changes. Don’t treat the belt like a greasy chain system. Clean around it gently and keep aggressive products away unless the manufacturer explicitly allows them.
A useful kit also needs soft and medium brushes. Soft brushes handle painted and glossy surfaces. Medium, non-abrasive brushes are better for textured areas, wheel faces, footboard corners, and awkward cooling slots where dirt gets trapped.
Finally, you need microfibre cloths that are kept for separate jobs. One for wash-stage wiping, one for drying, one for final finishing. Mix them together and you’ll transfer grit from the dirtiest part of the bike onto the most visible panel.
What each tool should do
A practical electric motorcycle cleaning kit should include:
- General cleaner for everyday road grime on painted panels, plastics, and metal surfaces.
- Degreaser for chain grime, oily deposits, and stubborn contamination on suitable mechanical parts.
- Detailing brushes for seams, switch surrounds, wheel spokes, caliper edges, and hard-to-reach dirt traps.
- Wash mitt or soft sponge for controlled contact cleaning on broad bodywork.
- Drying towel with high absorbency, so you’re lifting water rather than pushing it around.
- Protectant or ceramic spray for paint, bodywork, and exposed external surfaces after cleaning.
- Separate cloths for dirty jobs and finish work.
For riders dealing with bonded contamination on painted panels, especially after winter grime or industrial fallout, it also helps to understand how specialized paint decontamination tools work. That kind of decontamination isn’t something you do every wash, but it’s useful knowledge if your paint still feels rough after normal cleaning.
Keep one brush set for wheels and lower chassis only. Once a brush has lived around brake dust and road grit, it should never touch upper bodywork again.
What a bicycle-focused kit may include that you don’t need
Many riders waste money. Plenty of cycle cleaning kit bundles are built for bicycles with derailleurs and chain scrubber tools. Some of those items are fine. Some are unnecessary. Some are a bad fit.
On electric mopeds and scooters, common mismatches include:
- Chain scrubber gadgets on machines that don’t use a conventional chain setup
- Tiny frame brushes designed around pedal bike geometry rather than body-panelled scooters
- Lubrication products aimed at exposed bicycle drivetrains rather than enclosed or partially shielded systems
- Aggressive grime removers that are overkill for painted electric commuter machines
The best kit is the one that matches the bike you own. A LiveWire, a Vmoto city commuter, and a kids electric motocross bike won’t be cleaned the same way, even if the box says “bike care kit”.
How to Choose the Right Cleaning Kit for Your Ride
The right cycle cleaning kit depends less on branding and more on three things. What your bike is made of, how the drive system is set up, and where you ride it. Get those wrong and you can buy a kit that sounds complete but doesn’t suit your machine at all.
On UK roads, corrosion protection deserves more attention than most owners give it. Gtechniq’s Ultimate Bike Care Kit guidance states that kits with ceramic protectants reduce frame corrosion by 52% on electric scooters after 6 months in coastal regions. That’s a meaningful point for riders near the sea, for winter commuters, and for machines with mixed-material construction where corrosion can start around fixings and joins.
Start with the bike’s materials
A basic painted commuter scooter and a higher-spec electric motorcycle don’t always want the same products. Some machines combine painted plastics, alloy sections, coated fasteners, and trim pieces that mark easily if you use the wrong cloth or cleaner.
If your bike includes different metals or more premium finishes, surface protection matters more. A ceramic or protective finishing product won’t replace proper washing, but it can make later cleaning easier and help shield the surface from road film and moisture.
LiveWire riders should be especially careful around mixed finishes and detailed components. A cleaner that’s too aggressive can leave trim looking tired even if it doesn’t do immediate visible damage.
Chain drive or belt drive changes the job
This is one of the simplest buying decisions and one of the most overlooked.
If your bike has a chain, a degreaser is useful. You need controlled cleaning around oily build-up, and your kit should support that with the right brush and a separate cloth strategy.
If your bike has a belt drive, don’t buy a kit purely because it includes chain-cleaning tools. Those tools may add no value to your maintenance routine. Worse, they can push you into using products where they aren’t needed.
Here’s a simple comparison to keep the buying decision practical.
Cleaner TypePrimary UseSafe ForAvoid OnpH-neutral bike cleanerGeneral washing of bodywork, wheels, plastics, and painted surfacesPainted panels, plastics, external metal surfaces, routine cleaning on electric mopeds and scootersDon’t rely on it alone for heavy chain greaseDegreaserBreaking down oily grime and stubborn residueChain areas, suitable metal mechanical parts, dirty lower sections where grease has built upBelt drives, displays, charge-port area, broad painted bodywork unless specifically appropriateCeramic protectant or finishing sprayAdding surface protection after cleaningFrames, painted panels, exposed outer surfaces needing easier wash-down laterBrake components, controls, tyre tread, seat contact surfacesElectronics-safe detail cleanerLight cleaning around sensitive exterior areasDisplay surrounds, switchgear exteriors, trim near electrical housingsHeavy grease deposits or deep drivetrain contamination
Match the kit to your riding environment
A city commuter in Manchester or London deals with a different kind of contamination from a kids MX bike used on muddy ground. Urban riding means fine grit, traffic film, brake dust, and winter salt. Off-road riding means thicker contamination that must be loosened and rinsed before any contact wash starts.
That’s why environment matters more than marketing language.
- Urban commuters should prioritise road-film cleaning, wheel tools, gentle brushes, and paint protection.
- Coastal riders should pay close attention to protective finishes because salt exposure is harder on exposed metal and fixings.
- Off-road riders need a kit that can deal with dried mud without turning the wash into a paint-scratching session.
- Delivery riders benefit from fast, repeatable routines with products that clean efficiently and dry well.
What works and what doesn’t
What works is simple. A cleaner that lifts grime without attacking finishes. Brushes matched to the area being cleaned. A drying towel that absorbs water. A finishing product that leaves protection behind.
What doesn’t work is buying the most aggressive kit on the shelf because the bottle promises heavy-duty results. The dirt on an electric scooter isn’t solved by maximum chemical strength. It’s solved by using the right product on the right surface and leaving sensitive areas out of any brute-force approach.
If your main use is commuting, buy for repeatability, not novelty. The best kit is the one you’ll actually use every week without risking the bike.
The Safe Step-by-Step Cleaning Process for Electric Motorcycles
A safe wash routine is mostly about restraint. You don’t need force. You need order. Once riders follow the same sequence every time, the bike gets cleaner and the risk of accidental damage drops sharply.

Prep the bike before any water goes near it
Never wash a hot bike straight after a ride. Let it cool so cleaner doesn’t flash-dry on the surface and so you’re not putting water onto heated components.
Before you start, close or cover anything that should stay protected. Check the charge port cap, make sure storage compartments are shut properly, and avoid flooding around the display and switchgear. You’re cleaning the bike, not pressure-testing every seal on it.
Set your kit out in zones if you can. One bucket or mitt for upper sections. A separate brush or mitt for wheels and lower chassis. Separate cloths for drying and finishing.
Use a gentle pre-rinse
The first rinse is there to remove loose grit, not to blast the bike spotless. Use a gentle hose spray or low-pressure water flow and let gravity help you. Start at the top and work down.
Pay attention to mud traps:
- Behind the front mudguard
- Lower fairing or undertray edges
- Swingarm and rear hugger area
- Wheel rims and spoke junctions
- Footrests, floorboards, and side stand area
If the bike is heavily soiled, let the water soften the dirt for a moment. Rushing straight into contact washing is how grit gets rubbed into paint.
On kids electric motocross bikes, dried mud around plastics and fork areas should be loosened first and touched second.
Apply cleaner and let it work
Spray the pH-neutral cleaner onto the areas you’re washing, or onto your mitt for more control around sensitive trim. Don’t soak the display, charging area, or any exposed electrical connection.
Let the cleaner dwell briefly so it can break down traffic film. The key word is briefly. Don’t leave products baking on surfaces, especially if the bike is in direct sun.
Work in sections if needed. Front end first, then upper bodywork, then sides, then rear, then wheels and lower grime.
Agitate with the right tools
Use your softest tool on the most visible surfaces. Fairings, tank panels, side covers, and glossy trim should only see clean mitts or soft brushes.
Use a more firm but still non-abrasive brush around wheel faces, textured plastics, and awkward recesses. If your bike has a chain, now is when the targeted degreaser earns its place. Keep it localised to the dirty mechanical zone, agitate gently, and keep overspray under control.
A sensible order looks like this:
- Upper bodywork first so you’re not dragging lower dirt upward.
- Mid-level panels and controls next with careful brush use around seams.
- Rear end and swingarm area where grime is usually heavier.
- Wheels and lower sections last because they’re the dirtiest.
- Chain area only if applicable with separate tools and cloths.
A visual walkthrough can help if you want to compare technique and product handling before you try it yourself.
Rinse carefully, not aggressively
Once the dirt has been lifted, rinse from top to bottom again with gentle water flow. Don’t hold the stream close to bearings, switchgear, hub areas, battery covers, or cable entry points.
The aim is to carry dirt and cleaner away. If a patch still looks dirty, go back with cleaner and a brush. Don’t replace patience with water pressure.
Dry properly or the wash isn’t finished
Drying is where a lot of good work gets undone. If you leave water sitting around fasteners, seams, mirrors, brackets, and lower frame areas, you invite marks and moisture retention.
Use a dedicated drying towel and blot or pull the water off the surface. Don’t grind the towel into dirt-prone edges. For crevices, a gentle air blower can help move trapped water out from around trim and brackets, but keep the airflow sensible and controlled.
Focus on:
- Around the charge port and flap
- Under mirrors and lever perches
- Panel seams and trim overlaps
- Wheel nuts, spokes, and brackets
- Underside edges that hold runoff
Finish with protection and a quick inspection
Once the bike is dry, apply your chosen protectant or finishing spray to the suitable outer surfaces. This is also the best time to inspect what the dirt was hiding. Look for loose trim, rubbed wiring covers, missing fastener caps, cuts in tyres, and corrosion starting around neglected spots.
If your bike has a chain, finish that job separately and carefully. Clean first, let it dry, then lubricate with the correct product for the conditions. Keep lubricant away from brakes, tyres, and bodywork.
A proper clean should leave the bike looking better and give you a clearer mechanical picture. If it only makes it shinier, you’ve missed half the value.
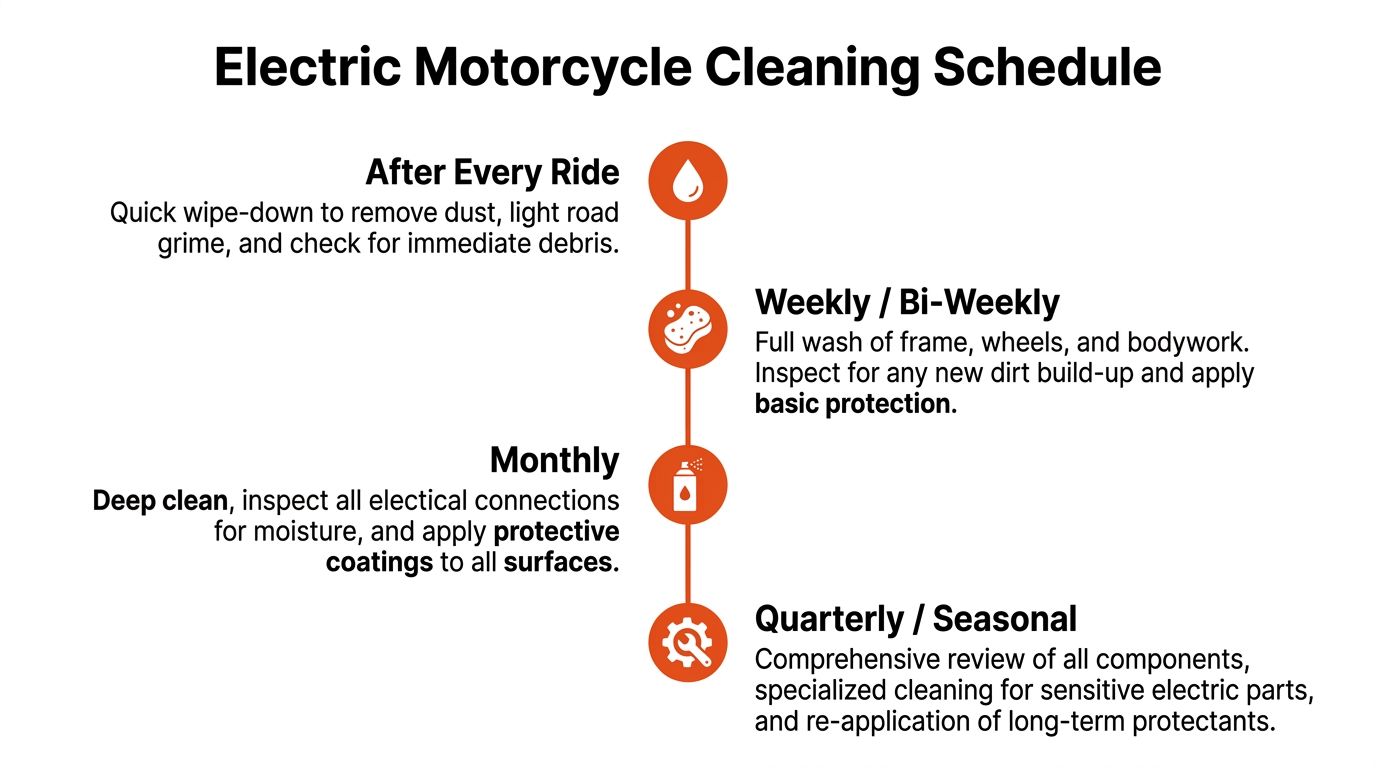
Your Electric Motorcycle Maintenance and Cleaning Schedule
The best cleaning routine is the one that matches how the bike is used. A sunny-Sunday rider doesn’t need the same schedule as a food delivery rider on wet city streets. But every electric moped benefits from having a routine instead of a random wash whenever the dirt becomes embarrassing.
Why regular cleaning pays off
This isn’t just about appearance. UK maintenance data discussed in this video reference says that bikes cleaned weekly showed 35% less chain elongation after 1,000 miles, and British Cycling guidance recommends chain cleaning every 100 to 200 miles in wet UK conditions. The same source notes that this level of maintenance can prevent friction-related efficiency losses of up to 15%, and for delivery riders, Flex Electric internal UK data reported 40% fewer warranty claims.
Even if your particular machine doesn’t use a conventional chain, the principle still holds. Regular cleaning stops contamination sitting on the bike long enough to cause wear, corrosion, and hard-to-remove staining.
A realistic routine for different riders
For most riders, this schedule works well:
- After every wet or dirty ride
Wipe down obvious grime, check the charge-port area is clean and dry, and remove fresh mud or salt before it hardens. - Weekly for daily commuters and delivery riders
Do a proper wash of bodywork, wheels, lower sections, and any grime-prone running gear. This is the routine that keeps buildup from turning into a bigger job. - Monthly for all regular-use bikes
Carry out a deeper clean, inspect hidden areas, clean around brackets and behind guards, and top up surface protection. - After winter salt or coastal riding
Wash sooner rather than later. Salt left sitting on the bike is never a harmless delay.
What that looks like in practice
A fair-weather Segway scooter used for short urban trips may only need a light wipe-down after routine rides and a fuller wash when road film becomes obvious.
A Vmoto used every day through commuting weather needs more consistency. It doesn’t have to be a long detailing session. It does need a dependable weekly clean so grit and moisture don’t settle into the same areas over and over.
An off-road electric motorcycle or kids MX bike should be cleaned soon after muddy riding. Dried mud is harder to remove safely, and it hides fasteners, damage, and wear points you want to spot early.
Clean on a schedule, not on appearance alone. By the time a commuter bike looks filthy, the grime has usually been sitting in the wrong places for days.
Keep the schedule simple enough to follow
Overcomplicated maintenance plans fail because riders stop doing them. If your cycle cleaning kit lets you complete a routine wash quickly and safely, you’ll use it. That matters more than owning every detailing product on the market.
A workable schedule usually comes down to three habits:
- Remove contamination early
- Wash properly at regular intervals
- Inspect the bike while it’s clean
That last point is important. Clean bikes reveal issues. Dirty bikes hide them.
Eco-Friendly Cleaning and Kit Care Tips
Eco-friendly cleaning matters for two reasons. First, many riders don’t want harsh runoff going down the drain if they can avoid it. Second, gentler products are often a better fit for regular cleaning on painted electric two-wheelers anyway.
The trick is not to confuse “eco” with “weak”. Some biodegradable cleaners work well for routine road film, light grime, and maintenance washes. Where they struggle is heavy, oily contamination that really needs a dedicated degreaser and more targeted agitation.
Waterless and low-water options
If you live in a flat, park on the street, or don’t have easy hose access, a low-water approach can still work for light contamination. Spray-on cleaners and waterless wash products are most useful when the bike has dust, light traffic film, or a recent layer of grime that hasn’t turned abrasive.
They’re a poor choice for a bike covered in winter grit or caked mud. In those cases, you need contamination removed before you start wiping. Otherwise you’re dragging grit across the finish.
A practical split looks like this:
- Use waterless products for light urban dust, fingerprints, fresh road film, and maintenance wipe-downs.
- Use a hose and full wash routine for muddy bikes, salted-road contamination, and heavy lower-body grime.
- Use degreaser sparingly and only where it’s needed.
Dispose of dirty wash residue sensibly
Used wash water may contain road grime, oily residue, and cleaning chemicals. Be sensible about where that runoff goes. Don’t tip dirty degreaser residue onto planting areas or anywhere it can collect around shared access points.
If you’re cleaning chain grime or stubborn oily buildup, use cloths to lift as much contamination as possible before rinsing. That keeps the mess more contained and makes the job cleaner overall.
Look after the kit or it will damage the bike
A neglected cycle cleaning kit becomes a source of scratches. Brushes trap grit deep at the base of the bristles. Microfibre cloths hold onto particles long after they look clean. Sponges are the worst for this if they’re reused carelessly.
Good habits are simple:
- Rinse brushes thoroughly after each wash
- Separate wheel tools from bodywork tools
- Wash cloths without fabric softener
- Air-dry everything fully before storage
- Replace tired cloths before they go rough
If you’re comparing materials and reusability, these notes on eco-friendly cleaning cloths are worth a look. The main takeaway for riders is straightforward: whatever cloth type you choose, cleanliness and task separation matter more than marketing claims on the packet.
A clean, organised kit saves time. Its primary benefit is keeping your next wash safe.
Frequently Asked Questions About Electric Motorcycle Cleaning
Some cleaning problems don’t show up until you’re standing there with a cloth in one hand and a worry in the other. These are the questions riders ask most once they’ve moved beyond the basic wash.
How do I clean matte paint without making it shiny
Use a gentle cleaner, a very soft microfibre, and light pressure. Matte finishes don’t like aggressive rubbing, oily dressings, or polishing products that add gloss.
If the surface is muddy or gritty, rinse and loosen contamination first. Don’t spot-scrub one patch harder than the rest. That’s how uneven sheen appears.
What’s the best way to remove baked-on brake dust from wheels
Start with a dedicated wheel-only brush and a safe general cleaner. Let the product dwell, agitate gently, and rinse. Repeat if needed.
Don’t use the same brush or cloth on painted upper bodywork afterwards. Brake dust is fine, dirty, and abrasive. Keep wheel tools in their own lane.
Salt, brake dust, and road grit all collect low on the bike. Treat the lower half as a separate cleaning job from the visible upper panels.
I rode near the sea. What should I do straight away
Wash the bike sooner rather than later. Focus on the wheels, lower frame, brackets, exposed metal, and hidden ledges where salty moisture sits.
Dry it properly afterwards and reapply suitable surface protection to the external areas you’ve cleaned. Coastal contamination is one of those jobs where delay makes the next clean harder and the long-term result worse.
Can I use a leaf blower to dry my electric scooter
Yes, carefully. A blower can be useful for moving water out of seams, brackets, mirror mounts, and trim edges. Keep the airflow controlled and don’t hold it aggressively close to delicate areas.
It’s a finishing aid, not a substitute for towel drying. Use it to chase trapped water, then finish with a clean drying towel.
Can I use household cleaners if I run out of bike products
I wouldn’t. Household products vary too much, and many aren’t designed for painted motorcycle surfaces, trim, or areas near sensitive components. Saving a few pounds on cleaner isn’t worth dull plastics, marked finishes, or residue where you don’t want it.
Stick with products intended for bike or motorcycle care, and keep the stronger chemicals for the specific jobs that need them.
What should I never spray directly
Avoid spraying aggressively into the charge port, display, switchgear, bearing areas, and obvious electrical connection points. Apply product to a cloth or brush when you need more control.
That gives you a far lower-risk clean and usually a better result. Direct spray is fine on broad outer panels. It’s a poor habit around sensitive details.
Do kids electric MX bikes need a different approach
Yes, mainly because mud is the issue rather than traffic film. Mud needs softening and rinsing before contact cleaning starts. Plastic panels also mark easily if dried grit is rubbed around.
The safest habit is to clean them soon after riding, while the dirt is still easier to remove. That also makes post-ride checks much easier for parents.
If your Vmoto, LiveWire, Segway, or off-road electric bike needs the right care products, servicing guidance, or straight advice on keeping it reliable in UK conditions, speak to the team at Flex Electric. We specialise in electric mopeds, scooters, motorbikes, off-road models, and kids MX bikes, and we’ll give you practical help that matches the machine you ride.
Find us
You will find us at 74 Dalry Road, Edinburgh, EH11 2AY
Showroom Opening Times:
Monday: By Appointment
Tuesday to Friday: 11am - 5:00pm
Saturday: 10am - 5pm
Sunday: By Appointment
